
Header photo by Conny Schneider on Unsplash
The scenario
I always had a feeling VPC Lattice would prove to be a very interesting product, but when it first was released it was very limiting. The inter-application capabilities always had a place in people’s own architectural designs but it never really got on my radar. When AWS announced VPC Resources for VPC Lattice, this opened up a lot of doors that had previously been shut.
Lets take for example, the Elastic File System (EFS) service that AWS offer. There are multiple ways to share EFS across accounts, but they all require a level of direct networking access. For example, Shared VPCs can be really handy to ensure that you continue to control the networking configuration, while allowing access to everyone on the same flat network. VPC Peering or Transit Gateways offered a chance to allow separate networks connectivity, allowing the shared responsibilities of the network configuration. However, what if you couldn’t connect the two networks in this way, what if you had a requirement to ensure the two accounts didn’t have direct network access.
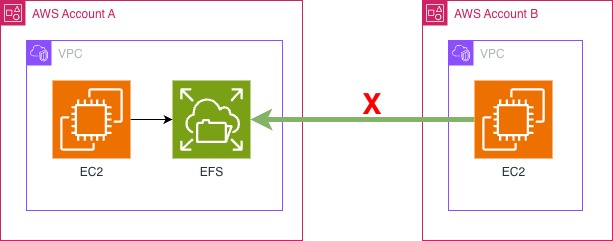
At this point, I wanted to see. Would it be possible to use VPC Lattice to mount an EFS storage share across two AWS accounts that had no direct networking capability.
The Setup
I initially had to find two AWS accounts, in my test setup, I was able to do this within my AWS Organisation, and have two accounts, in this instance we will call them Account A and Account B.
⚠️ Make sure that you have all features enabled at the AWS Organisations level (or Resource Access Manager as a minimum). Additionally, when building up this test, make sure that in both accounts the private subnet use the same Availiabilty Zone, including the ID - for example:
euw2-az2 (eu-west-2a)for Account A and B.
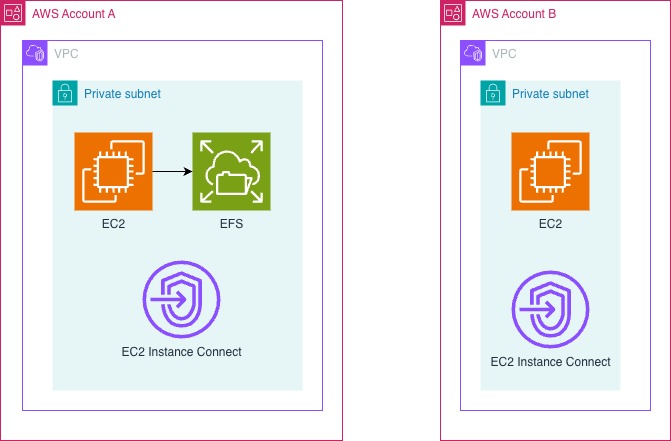
Account A would contain:
- A VPC with a private only subnet (10.0.0.0/24), with DNS hostnames and DNS resolutions enabled
- EFS setup attached to the private subnet
- For testing an EC2 Instance Connect endpoint, that will allow me access to an EC2 instance
- For testing an EC2 instance to prove that the EFS file system can mount internally, and we can write files
Account B would contain:
- A VPC with another private only subnet (10.1.1.0/24), with DNS hostnames and DNS resolutions enabled
- EC2 Instance Connect endpoint, that will allow me access to an EC2 instance
- For testing an EC2 instance to prove that the EFS file system can mount cross account, and we can write files
For the benefit of my testing, I will be using pretty much open security groups however, as I will show, you can use your own security systems on this, so long as you leave the right ports open.
To get started, I mounted the EFS volume onto my local Account A EC2 instance, and make sure I could write a file.
✅ Did you know, that you can mount the EFS file system at EC2 instance creation through the launch wizard? It also automatically creates the security groups to allow the connection too. Click here for more information
Configuration of the VPC Resource Gateway
Before we start, we must have a security group that will allow access inbound to the NFS port, TCP/2049 as the Resource Gateway needs to be able to connect to the EFS mount! With the wizard used to create the EC2 instance in Account A, this security group already existed so that I could use this. Make sure to check that you have this security group before you start, otherwise you will have accessibility issues.
A resource gateway is a point of inbound traffic into the VPC where a resource resides.
― AWS, AWS Documentation
Keeping in mind the direction of travel, this gateway is the entrypoint from the wider world into your VPC.
If you are using the AWS CLI, you can use the following command:
|
|
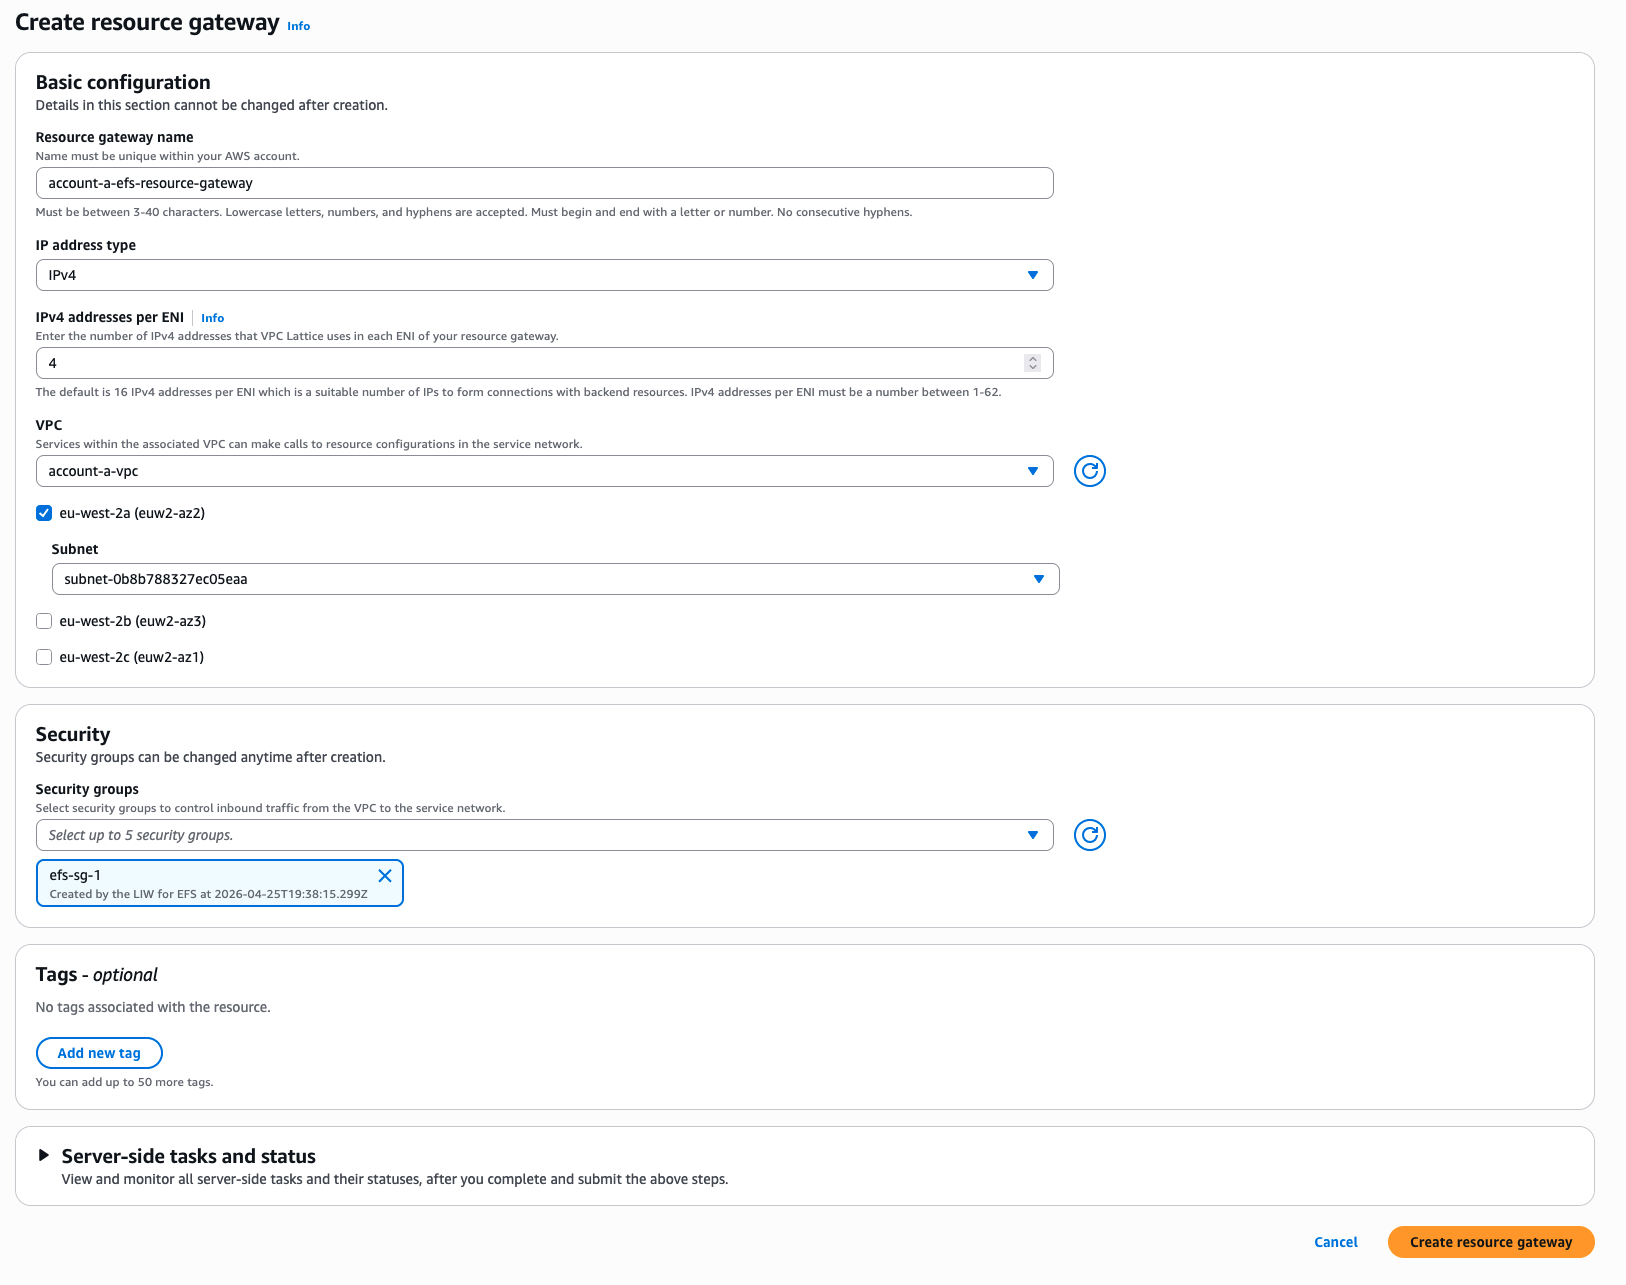
The Resource Gateway should appear up very quickly, and we can move onto the Resource Configuration
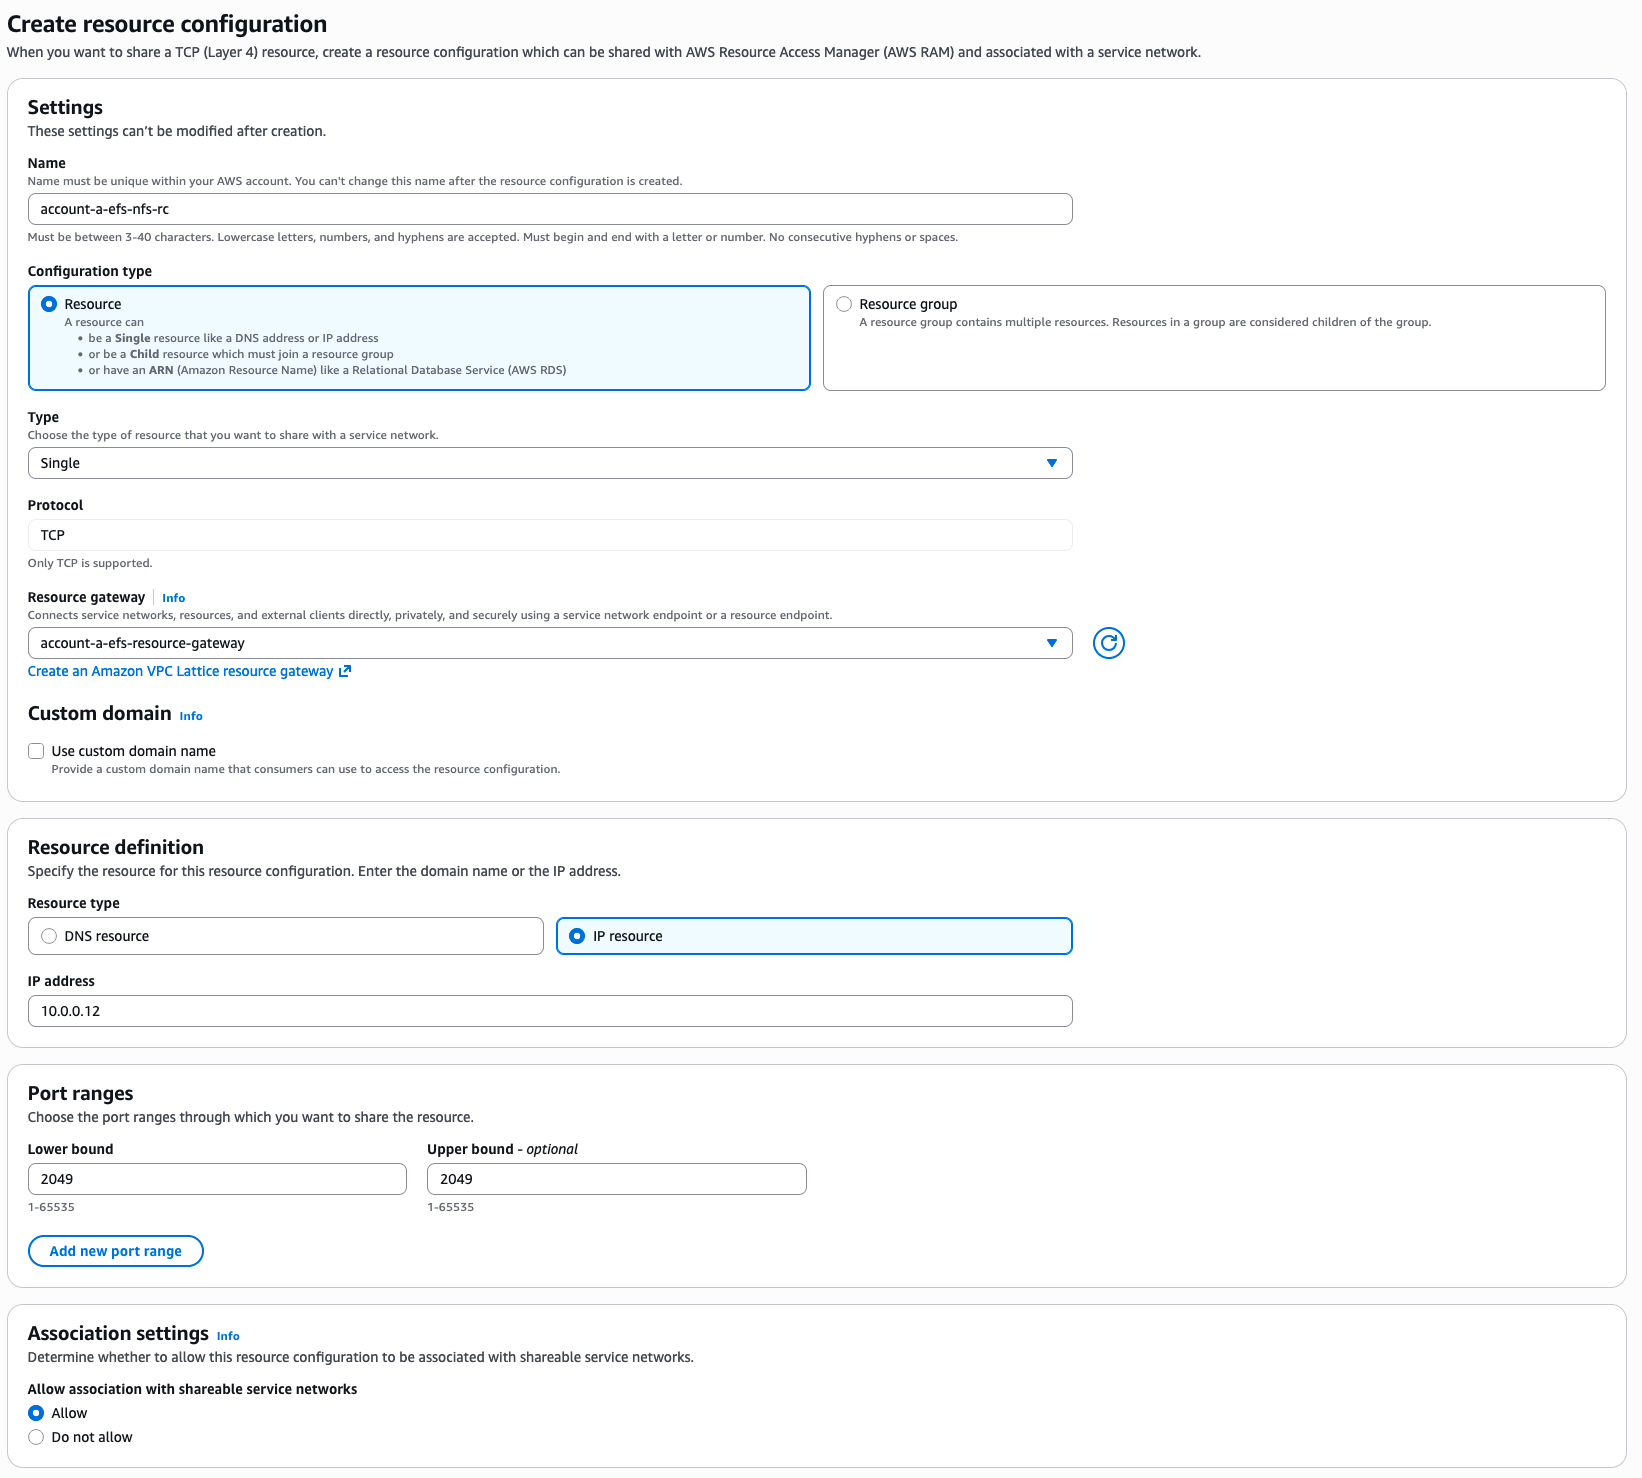
Configuration of the Resource Configuration
Unlike other resources, it isn’t possible to select the EFS mount within the configuration, but there are a number of ways. If you have set up your own DNS record for the EFS mount, it will be possible to use this. In my example, I am going to use the direct IP for the EFS mount. A simple host command on the box using the DNS name for EFS within the VPC gave me the IP for the EFS mount.
|
|
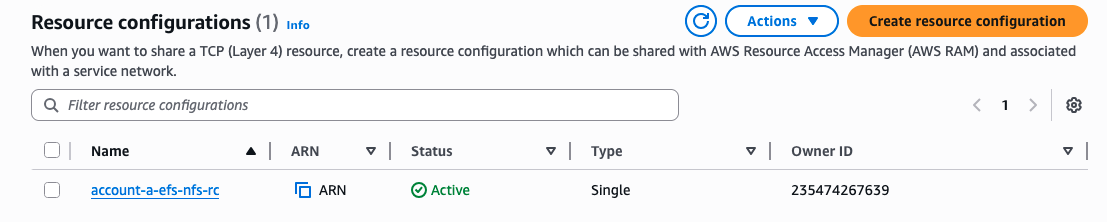
I can use the IP 10.0.0.21 in my Resource Configuration.
⚠️ This is not an ideal setup, but for demonstration this works just as well. Make sure that in production you use a service such as Route53 to cover private DNS records within a private zone
If you are using the AWS CLI, you can yse the following command:
|
|
Let’s run through some of the options here, the type “SINGLE” comes from a choice between a single Resource or a Resource Group. As we are not using a Resource Group, and connecting directly to a single resource (the IP of the EFS mount), we can use SINGLE.
The resource configuration definition is where we can define where the resource is within the network. Through the user interface this is a little easier to select, but here we are saying that the ipResource is the ipAddress of our EFS IP 10.0.0.21. Make sure to replace this IP with your IP!
Port ranges and the protocol lock the configuration to pointing to that particular port, as this is the only port that is needed for NFS.
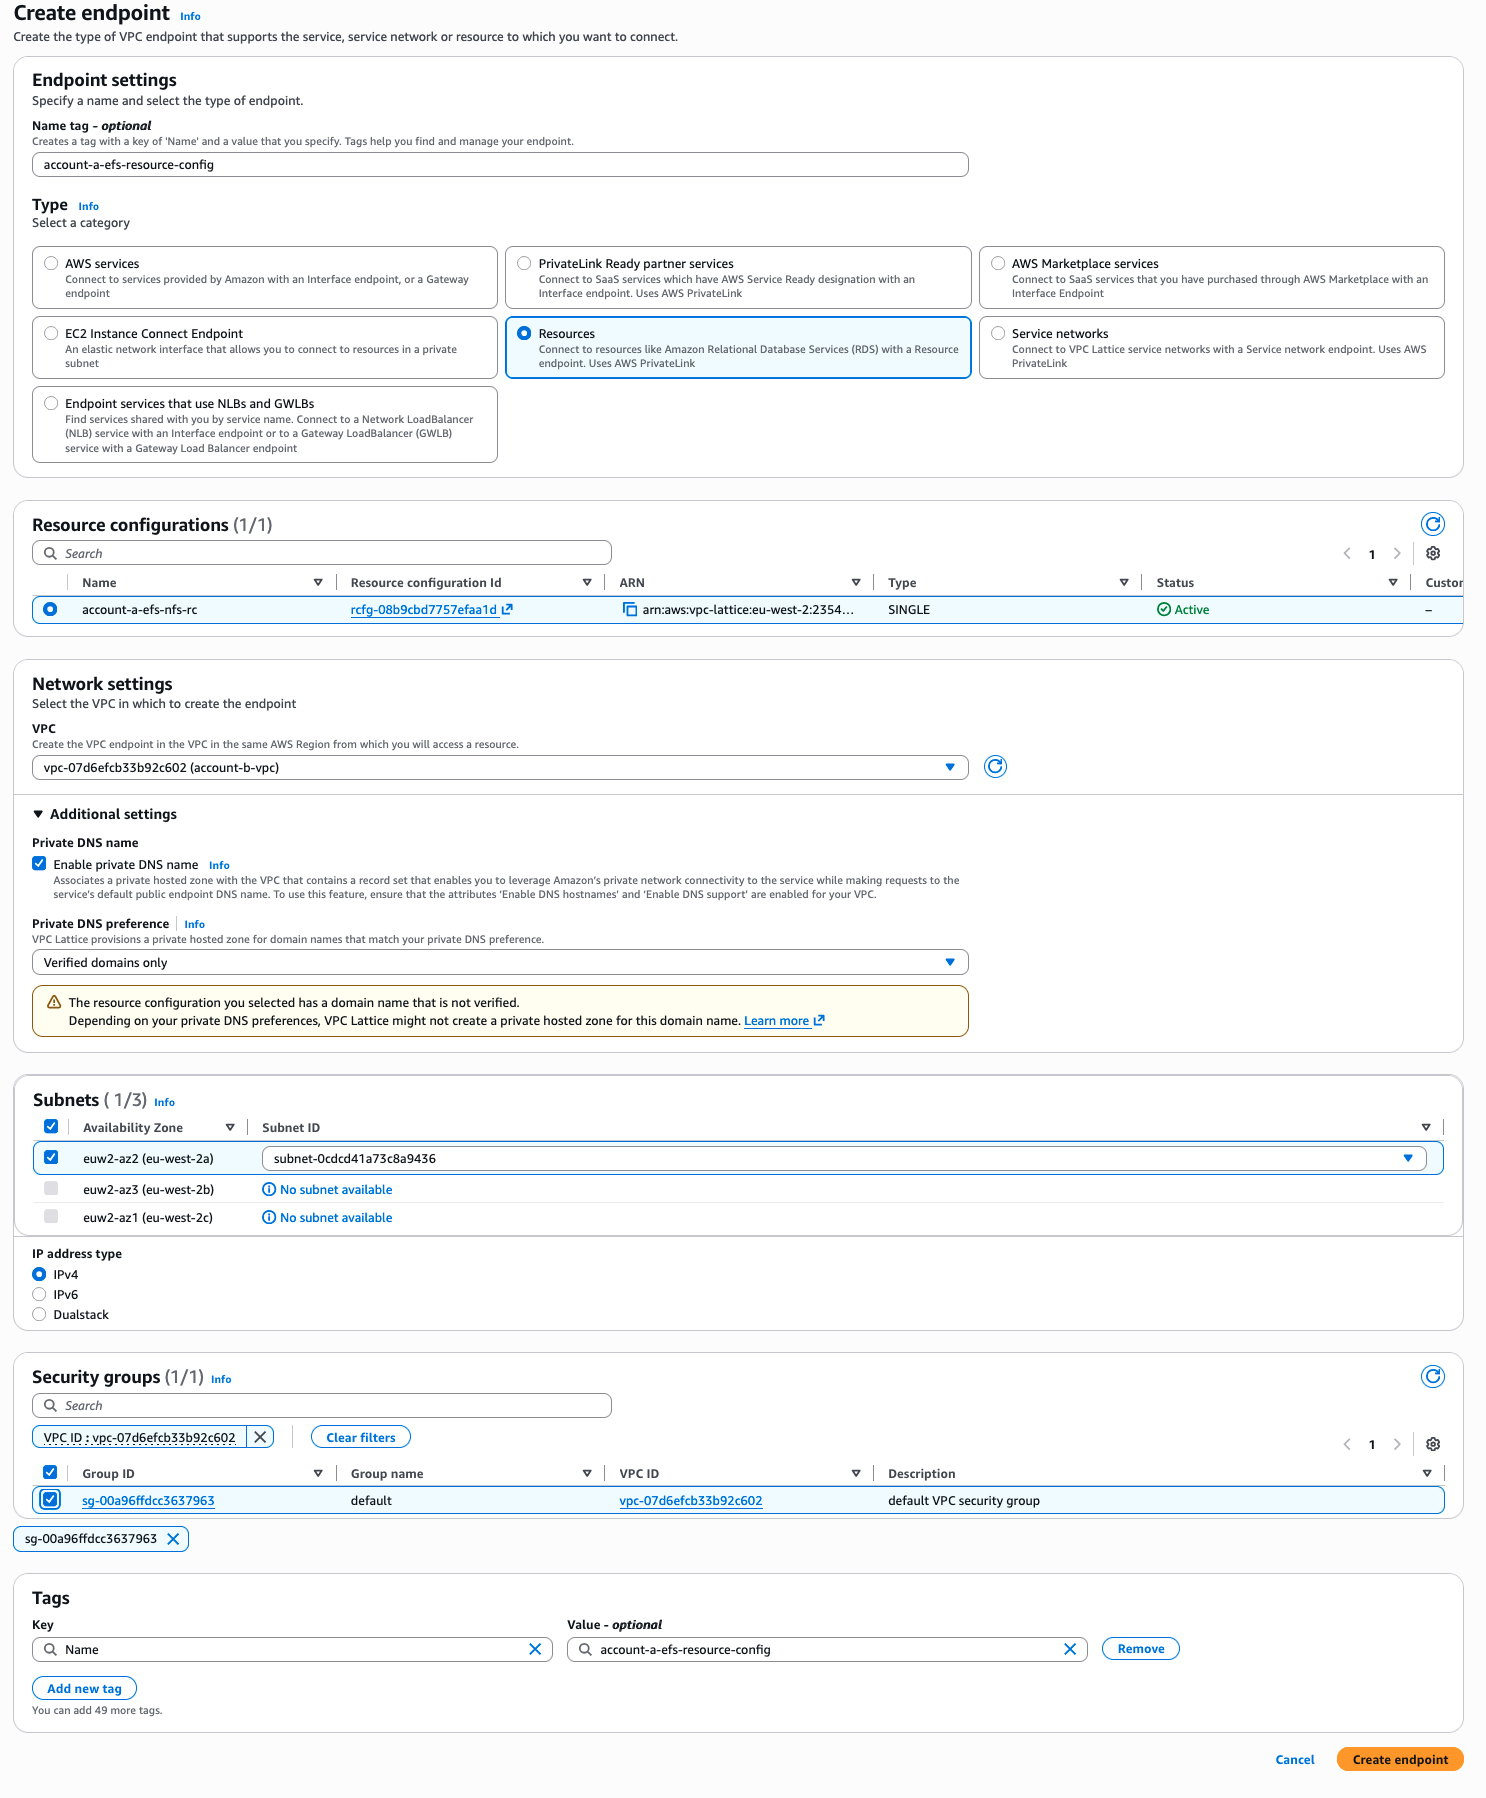
Below is a screenshot of the resource configuration page from the console
Configuration of the Service Network
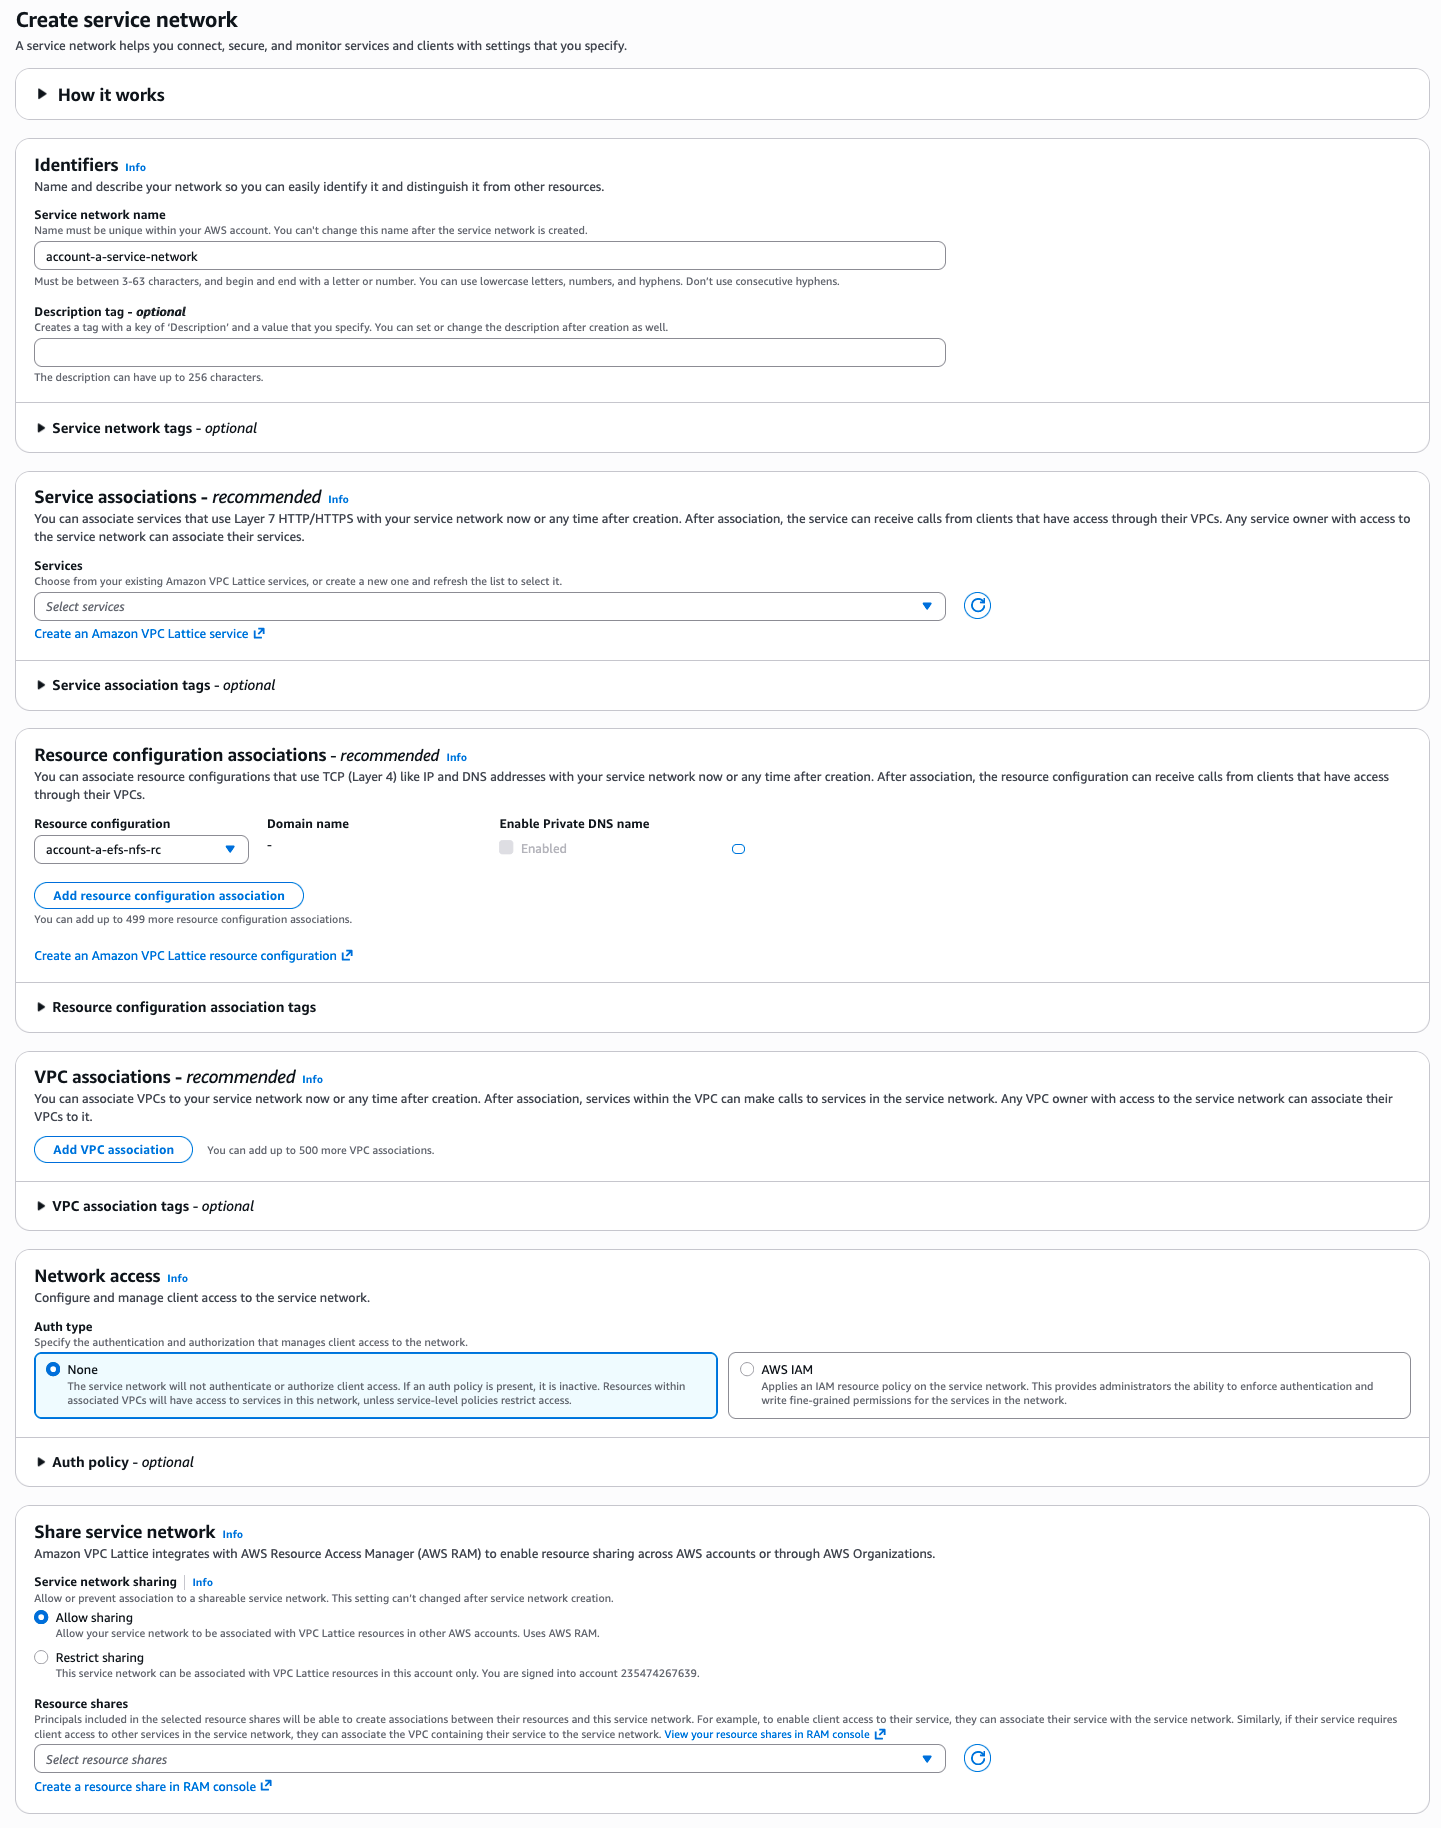
The next part of the journey is to create a Service Network within the VPC Lattice.
A service network is a logical boundary for a collection of services and resource configurations. Services and resource configurations associated with the network can be authorized for discovery, connectivity, accessibility, and observability
― AWS, AWS Documentation
This Service Network will be used to associate our Resource Configuration to, and therefore allow access to the wider world to our EFS mount. This can be done very simply with the AWS CLI, or the console:
|
|
This can be done in a single step from the console, which you can see below. do make sure that the default is used for the “Share service network”, to allow sharing through AWS RAM!
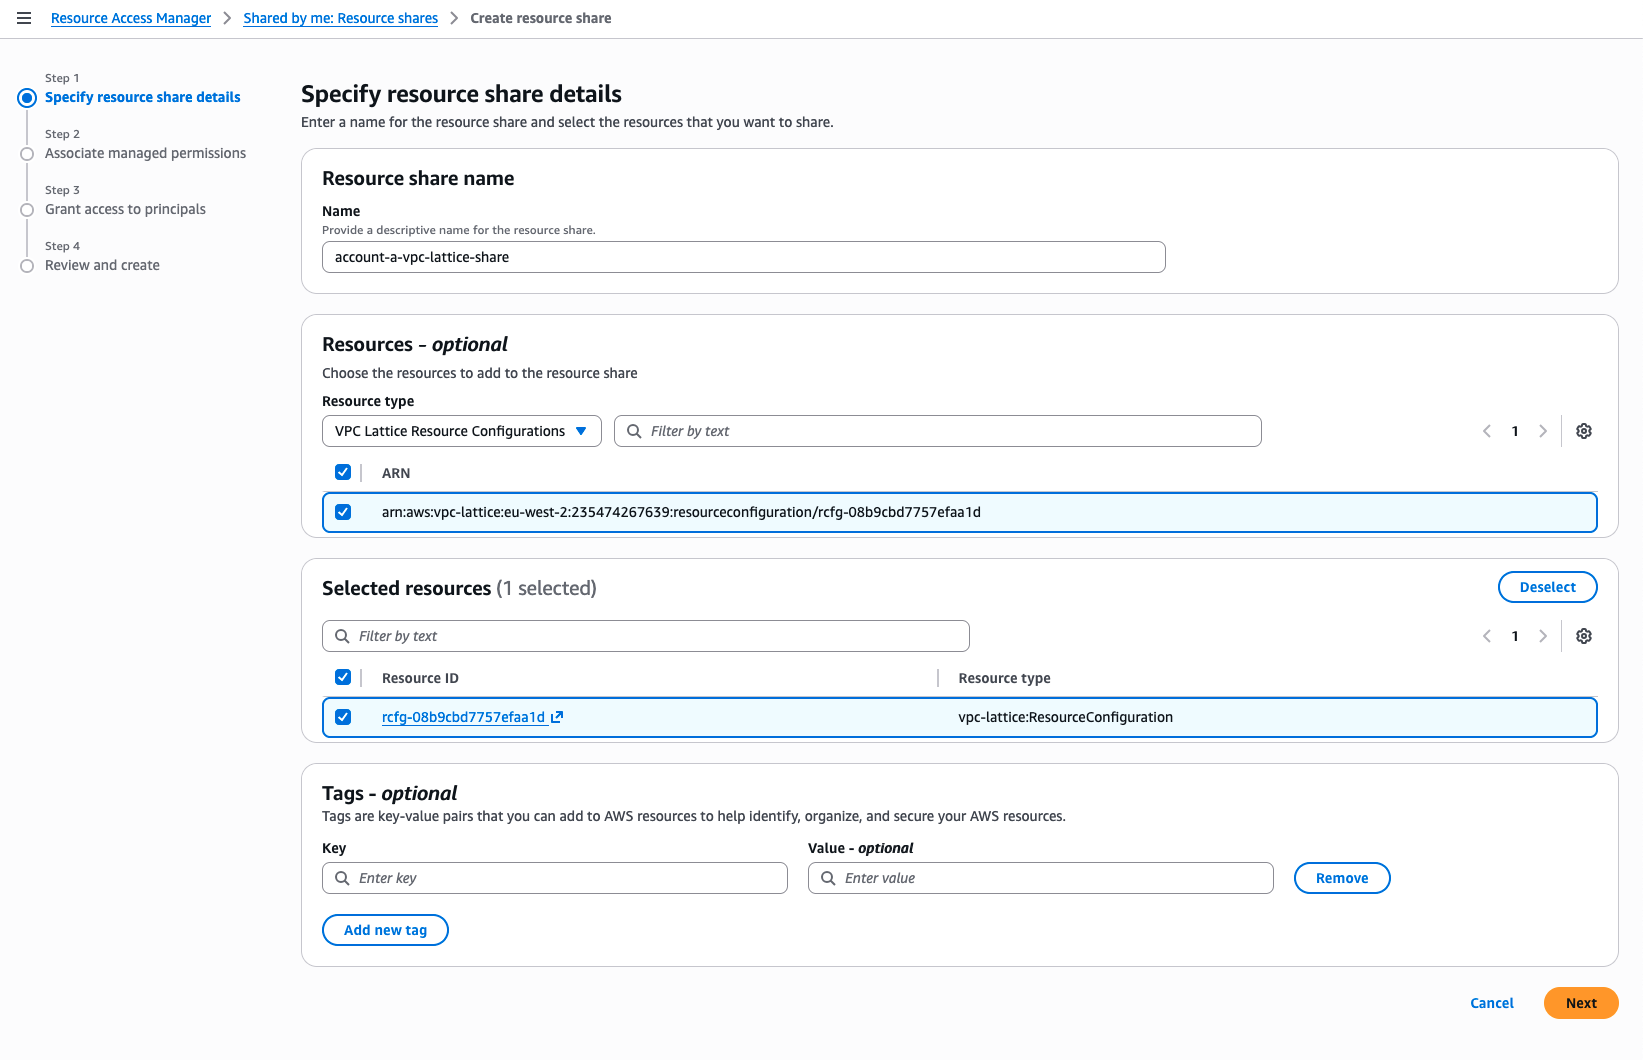
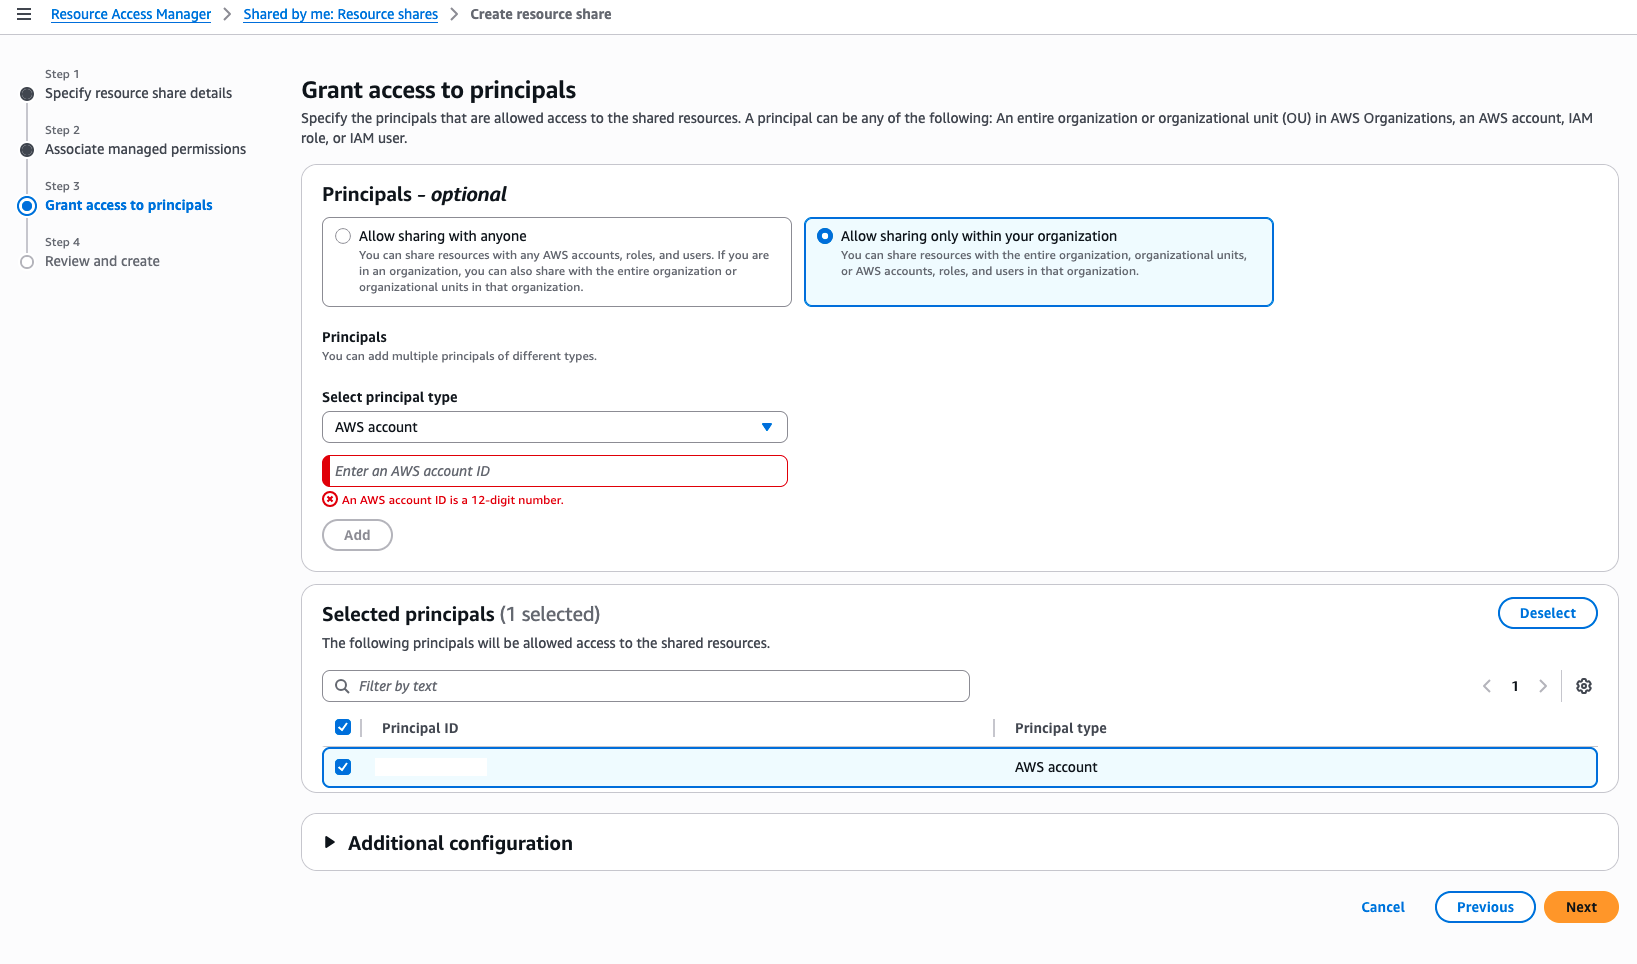
Share the Resource Configuration using AWS RAM
One of the great features of AWS Organisations is the ability to share resources across multiple AWS accounts or even whole OUs. This feature can allow for a must faster distribution of sharing, privately, and securely without a lot of configuration. For example, our EFS mount point could be made available to many hundreds of accounts, without ever needing to setup networking connectivity between all of the VPCs. However, in our setup, I am specifically going to select one account within the organisation!
AWS Resource Access Manager (AWS RAM) helps you securely share your resources across AWS accounts, within your organization or organizational units (OUs), and with AWS Identity and Access Management (IAM) roles and users for supported resource types
― AWS, AWS Documentation
However, during my testing, and using a whole load of Google Searches, I found that there are two ways to get this shared. You can either share the Resource Configuration directly, or Share the VPC Lattice Service Network. This will completely depends on your exact setup, the single resource share means you can be very specific that you are sharing one resource. You can create the VPC Endpoint within the Account B’s VPC and you will have direct access. Sharing the Service Network as well, means you can connect to multiple services within the Lattice, handy for wider options around sharing multiple services between AWS accounts. While I am going to show how to setup the Service Network Share here, I am also going to show the Resource Configuration option, as this is the one I have been using for my testing.
|
|
Configuration of Account B and the VPC Endpoint
At this point, we are pretty much done with Account A, we now need to move onto Account B. With the RAM share in place, this would have been automatically accepted in Account B, and will be visible within the console.
To connect to this resource configuration, you will need to setup a simple VPC Endpoint. As we will be doing this with the resource configuration the steps are slightly different, but this will get you the VPC Endpoint you. need.
⚠️ Make sure you have an appropriate security group. With the default group that is created by the EC2 creation process, the outbound rules are always set to
0.0.0.0/0allow outbound, so there are not restrictions. You will need to make sure that any Security Group added to the VPC Endpoint allows outbound access to portTCP/2049to access the NFS endpoint
Creation of the VPC Endpoint through the AWS CLI is below:
|
|
Let’s Mount that EFS Volume
This is where I had to go a little deeper in to get this to work. As DNS will not work across the account boundries, we need to come up with another solution. The VPC Endpoint, once created, will have its own Elastic Network Interface (ENI) within your VPC. This will have an IP associated with it that we can use to mount the EFS share. The frustrating element of this, is that the VPC Endpoint page in the console doesn’t actually show the IP address! I had to look for the ENI in the EC2 console for the VPC Endpoint, and I discovered that the IP of my endpoint was 10.1.1.57.
This does have a minor drawback, you need to use the IP in the mount command to be able to attach it to the EC2 instance within Account B. I would always recommend that you setup your own Route53 Private Zone that you can use to a record to the VPC Endpoint, so that way you can use an internal DNS name to connect. One solution I have for multiple accounts, is to make the DNS record privately the same across all the AWS accounts, and then your scripts that you use to mount the EFS volume can stay the same. It’s one of many solutions, but continuing forward, I am going to use the direct IP.
Before I break this down, here is the command to enter in on the EC2 instance in Account B
|
|
Most of this is pretty simple, its using the mount command to attach to the IP’s root share, to the newly created directory. However, the -o has a number of options which are key to ensure the success of this test!
nfsvers=4.1: This ensures that the NFS client does not try for a lower version of NFS. Parallel NFS, and Sessions were added in the new version of the NFS protocol, which allow for a faster level of recovery. AWS have built EFS using the 4.1 standard, which could break over the VPC Lattice
rsize=1048576,wsize=1048579: This is the read AND write side maximum number of bytes that the NFS client will request from the server (1MB). With the VPC Lattice, there are a lot more hops which can induce a level of latency which isn’t seen in a local network setup. Trying to push the maximum amount of data in one go means there is less time going backwards and forwards to get data.
hard: Standard NFS option for mounts on NFS, in this case hard means that the application will block and wait before resuming transparently. Soft can be used, but in an I/O issue, it will just return an error to the application that can cause issues. This needs to be set based on your requirements, soft can have unintended outcomes, but also fix issues that your application might have. In our case, we have used hard
timeo=600: This timeout is based in tenths of a second not seconds, that is used by the NFS client to know how long to wait before retrying a request. In this case, this is actually 60 seconds. With the additional hops over the VPC Lattice, a larger timeout would be better, to ensure the returning traffic had time to navigate the Lattice.
retrans=2: Number of times that the NFS client will retry a request within the timeout window. Like the above, you need to understand your network and application to set the right figure. Where I am not bothered with speed, I tend to increase this, whereby if I am sensitive to time, I usually reduce this down.
noresvport: This setting is ultimately key for the VPC Lattice setup, as mentioned before we have only opened up the NFS port on 2049 to be allowed to connect. By default, the NFS client will attempt to use a source port within the reserved port space (below 1024), that only the root account can bind to, a legacy reason that allowed the server to know that the it was a connection from a root account. This is specifically called out in the EFS AWS Documentation to ensure a faster reconnection of network recovery after an event.
Checking it has worked
|
|
If all has gone to plan, I can see a file I put in the EFS mount point, I can also add my own file and watch it go the other way!
|
|
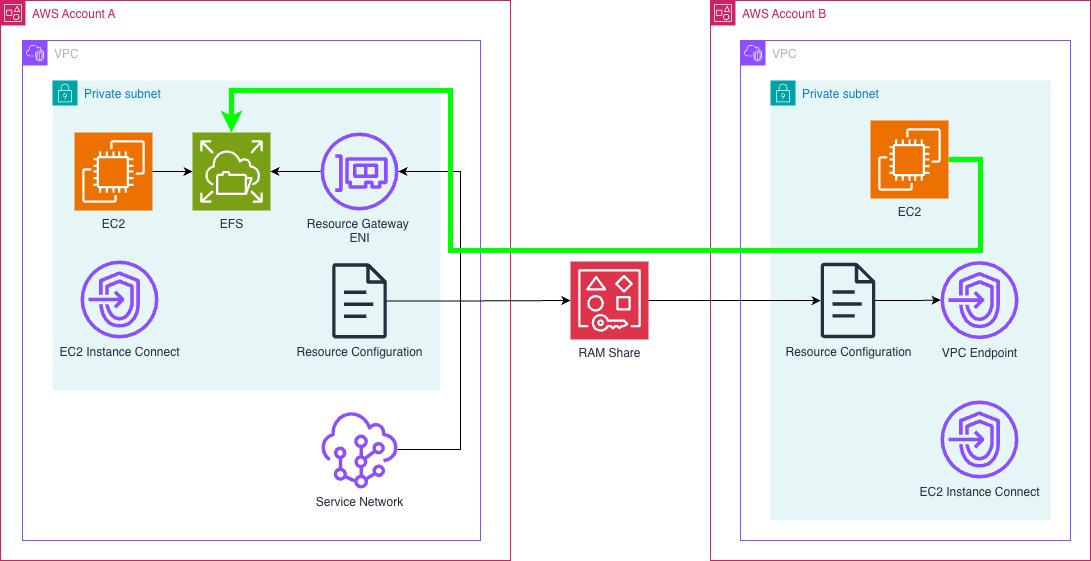
Architecture Diagram
Conclusion
While the final step feels a little custom in how you would mount the EFS mount, noting that it isn’t possible using the EFS utilities, it can be used to securely mount an EFS volume from one account to another, without any level of networking access. Additionally, overlapping IP’s can be an issue as well, which brings it back to where VPC Private Endpoints helped in the past too.
Do note that my testing is specifically for a single AZ with little security built in, but along the way it is possible to add the right level of security that you see fit!
EDIT: Images have been updated to show the latest console changes